Monday, July 25, 2011

Mango Salsa

I LOVE this salsa!!! What a great time of year it is to make this amazing salsa. It is so fresh, healthy and delicious. I hope that you love it!
Here is your list of ingredients...so easy, so yummy, and so simple!


4 "Bountiful" Mangoes
1 Bunch Cilantro
1/4 C. Red Onion
2 Lg. Limes
1 Jalapeno
1 Bag Hint of Lime Chips
(Oh and don't forget my secret ingredient so secret that I didn't even put it in the picture:) 4 Dashes of Ginger) 
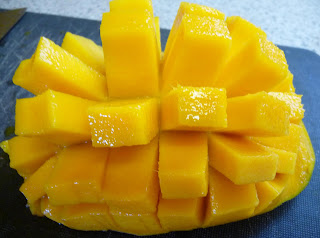
 If you are new to this delicious and very healthy fruit let me introduce you to it. The mango has a large flat seed in the middle of it that can make it a bit tricky. So the best line of attack is to take your knife and starting from the top slice down the middle of it cutting around the seed. You then want to score it with your knife being careful not to cut your hand. Then flip it inside out like so.
 Then slide your fingers under the skin of the mango (holding it over the bowl so that you don't loose all of that tasty juice) and pop them out and into a bowl.
Helpful Hint: I had particularly large mango's so I gave them a shave with my knife to make them a bit smaller and then popped them out with my fingers.

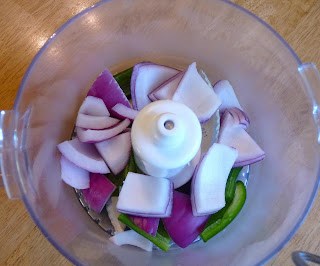
Next you want to chop up your jalapeno and onion into chunks and throw it in a mini food processor and chop it up as big or as little as you like yours, I don't like a big bite of onion so I chop mine small.
Add this mixture to your mangoes. Next chop up your cilantro, which you can add to them food processor with the onion and jalapeno if you like. I just like mine a little less chopped so I do it separately. Add your cilantro, lime juice and ginger and stir to combine. Like I said so simple and so good, enjoy!


Helpful Hints AKA Some like it Hot: This is not a particularly spicy salsa, I am shall we say heat sensitive:) If you would like it to be a bit spicier then feel free to add more jalapenos or even the seeds if you are like it hot.

Tasty Suggestions: This is a big recipe so here are some other great ways to use it up.
Over Grilled Chicken
In a Grilled Chicken Salad
Over Fish
On a Hamburger
My list could go on and on but I would love to hear what you all do with it!

Friday, July 8, 2011

Honey Ginger Butternut Squash with Pecans

I hope that everyone had a great 4th of July this last week! We went camping over the long weekend and all I have to say is that if you give me a holiday it is going to set me back for days! Especially if we go somewhere, but these are the glories of Summer! Camping was great fun and we made some great memories. I did however get my basket this week and was pleasantly surprised to get Butternut Squash. There are many things that you can do with Butternut Squash I had a difficult time trying to decide whether to make soup with it or to roast it. I decided that July just didn't feel soupy to me. But roasting it would make it a great side dish to your BBQ and as July is unofficially BBQ month as far as I am concerned I went with this one. So here it is and I have to say that as Butternut Squash is in season where I live in the fall, this would compliment turkey dinner perfectly!

Before we get to the ingredients list I have one disclosure. I LOVE sugar on my squash! But in honor of my Mom who insists that it should taste like squash and not candy I will give you a range of amounts on the sugar and you can decide how you like it. 

3 Lb. "Bountiful" Butternut Squash, Peeled and Diced
2 1/2 Tbsp. Olive Oil
2-4 Tbsp Brown Sugar
2 Tbsp. Honey
3/4 Tsp. Ginger
Pinch of Cloves
3/4 Tsp. Salt
1/8 Tsp. Pepper

And of course my token ingredient that I forgot...Someday I will remember all of my ingredients in my first picture:) 1/4 C. Chopped Pecans

The first thing that we need to do is  get our squash peeled and diced. The best way to do this is to start by peeling it with a potato peeler.

Next you want to cut your squash in half


Once you have them cut in half take a deep breath... no it is not difficult to cut in half, but I think that it smells so good that you have to make sure to experience it. I know, I know I am such a foodie, but these are the simple pleasures of being the cook. Now it is time to gut these babies. Take a spoon and take out the innards like you would a pumpkin.

Then dice your squash into 3/4 inch pieces. Next you want to combine all of the remaining ingredients except for the pecans in a bowl. Then microwave them for 30-45 seconds just to melt the sugar and make sure that it all blends well. Don't over cook it though or it will just get hard and crusty. Then toss the mixture with the Butternut Squash to coat completely, I like to use my hands it seems to work best. Pour your squash onto a lined sheet pan and bake at 425 degrees for 35-45 minutes, adding your chopped pecans the last 10 minutes so that they get toasted.


Helpful Hints: The way that I did my sugar is that I put 3 Tbsp, Brown Sugar into the mixture and then I sprinkled the last Tbsp. on the top before cooking it. It was perfect for me and I have to say that to me it still tasted like squash and not like candy. And one last thing be careful with the Cloves, while I love the depth of flavor that they give to this recipe, Cloves do have a very strong flavor so don't over do it. If you are not a fan of cloves feel free to omit them from the recipe.

You want them to be tender and slightly golden brown on top and caramelized. The pecans give this dish the perfect touch and turns this side show into the main act! Enjoy! 


Thursday, June 30, 2011

Rustic Apple Tart


Happy 4th everyone! What is more American than Apple Pie? This Rustic Apple Tart of course. I was so happy to get Granny Smith Apples this time. When cooking with Apples these are one of the best because they are strong in flavor which helps them to maintain that great Apple flavor after cooking and their texture also stands up to the heat of the oven. This Apple tart is a bit like making a French Apple Pie just a bit more elegant and easier. Served with a big scoop of Vanilla Ice Cream and you will find yourself in Apple Tart Heaven!
Is your mouth watering yet? Because I know that mine is! Are you ready to get cooken'? This tasty treat not only looks and tastes good, but it smells divine! Here is what you will need for the tart.


2 C. Sifted Flour
1 Tsp. Salt
2 Tbsp. Sugar
2/3 C. Cold Unsalted Butter plus 1 Tbsp. (for brushing)
3 Tbsp. Ice Water
First start by sifting your flour. Then measure it. That's right sift then measure. This can be a bit confusing but in order for you to have flaky, buttery crust this is very important because 2 C. sifted is less flour than 2 C. unsifted. Add all of your dry ingredients into a food processor and blend to combine. Then cut your butter into the dry ingredients and pulse until it looks like so. 


Yes this is exactly like the Blackberry Scones but a bit easier because of the food processor. But don't do your Scones like this unless you plan on hand mixing the remaining ingredients because you will over mix them in here. But like the scones this is a pastry and so you want your ingredients to be very cold! Once you have it to this point slowly add in your 3 Tbsp. Ice Water.


Then pulse your dough until it forms a ball like so.
Helpful Hints: Unfortunately pie dough is not an exact science, it is easily effected by the weather and other things like the water content in your butter. But don't let this deter you from making it. Just add the water a little at a time until you dough begins to pull together, for me that was 3 Tbsp. 


Once you have your dough then on a lightly floured surface form it into a disk, try to handle it as little as possible though you really want to keep it as cold as possible so that it remains flaky and delicious. Then place it in the refrigerator for 30 minutes to an hour.
While that is taking a cat nap in the fridge. Let's get started on the topping!  Here are your remaining Rustic Apple Tart ingredients.


1/4 C. Rolled Oats
3 Tbsp. Brown Sugar
1/2 Tsp. Cinnamon
1 Tbsp. Flour
1/2 C. Walnuts
3 Tbsp. Unsalted Butter
1/8 Tsp. Salt
6 "Bountiful" Granny Smith Apples
To keep this simple I just through all of my ingredients back into my food processor and pulsed them until they chunky and looked like so.


Now let's get back to that pie dough. I like to use parchment paper for my pie dough, it just makes everything play well. I don't even use flour when I do this because it tends to make the texture off a bit. Oh and my favorite parchment paper is the kind that you get in sheets not on a roll! That stuff just rolls up on you and is a royal pain. You can get the sheets at most kitchen stores and they are well worth the trip. I use them all of the time. One more not on rolling out pie dough. Start from the middle and work your way to the edges but don't use too much pressure at first. Sure this will take more time but your patience will be rewarded, if you push too hard it will crack. Roll your dough out until it is about a 1/4 inch thick. It doesn't have to be perfect remember that this is a "Rustic" Tart. It should look a bit like this. 
Now for the next step that makes this Rustic Tart so easy with parchment paper. All you have to do next is transfer it to your baking sheet and slowly pull off your top layer of parchment paper.
I then place my sheet pan in the refrigerator while I get started on my apples. Slice your apples in half and them with a melon baller or something like it. I used a strawberry huller because my melon baller was M.I.A. and as you can kind of see, we got in a fight. I won of course:) Then slice your Apples 1/4 inch thick.
  Then neatly place your apples around the center of your tart leaving about 1 1/2 inches of pie dough around the edges. They will really cook down so pack them in tight. Once you have your apples all layed out mix together 3 Tbsp. Sugar and 1/2 Tsp. Cinnamon and sprinkle it over your apples. Then carefully fold your pie dough up and around your apples and add your topping. Then Brush with remaining Tbsp. butter that you have melted and dust your dough with sugar. Here it is before you cook it.
 
Now place it in a 400 degree oven for 35-45 minutes or until it is golden brown and bubbly.

And here it is after! Isn't it pretty and elegant? I know that I always say that but as many of you know we eat with out eyes first, then out nose and last and best our mouths. This tasty treat just happens to have to cover them all! Oh and don't forget that vanilla ice cream. I hope that you all enjoy it!

One last tip! Don't be intimidated by the pie dough. If you are worried about it just use store bought pie dough, I always like homemade better but it will be great either way!


Monday, June 27, 2011

A Gardener's Delight: Peas Please!


 Yeah! I have peas!! To be honest I took this picture about a two weeks ago. But I was so exited to finally get them with the crazy Spring that we had this year that I decided that I needed to write a section that I lovingly call A Gardener's Delight! Because as a gardener this is the kind of thing that we live for. There is nothing like the first true harvest of the year. I usually start harvesting my first peas around the middle to end of May. But this year I had to wait until the middle of June! So these babies are a long time in coming. Now for a little pea 101! My favorite peas to plant are Sugar Snap Bush Peas. They are completely hassle free, sweet and delicious. They are stringless and they don't require staking like in Pole Peas which truly makes them a gardeners delight. There are many different varieties of these peas. I think that these are actually called Sugar Ann Snap Peas. Just ask someone where you buy them if they are the Sugar Snap Bush Peas and they can usually tell you. If you live around the South Salt Lake or Utah County areas I really like to get my seeds from a place called Carpenter's Seeds or Cook's is another great place to get them. Generally you want to have them in the ground around the first couple of weeks in March. If you find yourself a bit behind then soak them for anywhere from an hour to a couple of days. They can also be planted in the Fall for a second harvest around September. My Dad loves these peas and we have had them in our gardens for as long as I can remember. So I will give you a tip from my Dad. Dig a trench about an inch deep and just kind of throw them in there broadcast style. They will work beautifully. I don't even thin mine just throw them in there and let them grow. This year for the first time I actually followed the directions on the seed packet and I was disappointed with the results. Turns out my Dad did know best.


Peas are not just a Spring time treat for you, but they are a treat for your soil also. Peas are legumes which means that they put nitrogen into your soil. So make sure that when you pull them up that you add them to your compost pile or you can even just till them into the ground. But as for us they are packed with vitamins, antioxidants and flavor. They can be either eaten raw right off of the bush, in salads, stirfrys or my personal favorite sauteed. Here is how I do it.

2 C.Peas
1 Tbsp. Butter
1 Tsp Fresh Lemon Thyme
Salt and Pepper
(Serves about 4)

I know that this recipe is not perfectly exact but many times when you are cooking from your garden they won't be. So consider this recipe a push in the right direction more than a ridged list of ingredients. If you are not familiar with Lemon Thyme let me introduce you. I love this stuff! It is has the great characteristics of Thyme but with a fresh lemon hint to it. This is not a herb that you will find in the store but in your local nursery. And if I haven't said it enough one of the best things that you can do for cooking at home is to grow your own herbs! They are so easy to grow and SO much cheaper. If space is of the issue they do great in container gardens. Here is my beautiful Lemon Thyme.

This is a very easy recipe that can be made in minutes. The first thing that you want to do after picking your peas is to wash them and take off the stems. Then in a saute pan melt your butter and add your lemon thyme. Then when your pan is hot add your peas generously salt and pepper to taste and stir them until they turn bright green when this happens I usually cook them for about 30 seconds to 1 minute longer and then take them off of the heat and serve. You want them to still have some crunch to them so don't over cook them. I hope that you love them as much as I do. Stay tuned throughout the summer and fall for more Gardening Delights!

Wednesday, June 22, 2011

Blackberry Scones

This week I have to say that I really had a difficult time narrowing the possibilities down to just one recipe. In the end though these fantastic little treats won. They are flaky and delicious and an easy way to bring a fancy touch to your breakfast or brunch.


Blackberry Scones


Again the ingredients list really isn't too complex which is always a bonus! Here is what you will need.


2 C. Flour


1/4 Plus 1 1/2 Tbsp Sugar


1 1/2 Tbsp. Baking Powder


3/4 Tsp Salt


3/4 C. Buttermilk


2 eggs


6 Tbsp. Cold Unsalted Butter


1 1/2 Pints Blackberries


Helpful Hints: Just three little hints about this list of ingredients before we get started. First the buttermilk, you can use the old standby substitution of milk and vinegar but I just think that it tastes better when you use the real thing. Oh and while some of you may think that this is gross I keep my buttermilk long after it's due date...It's acidity levels are so high that it really takes much longer to go bad and I have to say that I think that in baking it actually works better after the due date. It makes things more moist. So it is really a great thing to just have on hand if you plan on baking much. Second you will see that I have used Unsalted Butter, again you could use regular butter and a bit less salt BUT... you will Not get the same flavor! The unsalted butter gives them a more elegant flavor and texture. And one very last very important hint! Like other pastries you want your ingredients to be very cold. This is what sets great pastries and not so great pastries apart. Your ingredients must be cold!


Bring on the berries! I recently heard of a fantastic trick to adding berries to things like scones. You wash them and in the case of my recipe add 1 1/2 Tbsp of sugar to them stir them up and put them into the freezer for about 1/2 hour. This helps to maintain the structure of the berries when you are mixing them in. I am not suggesting however that you uses frozen berries. Fresh is always better! Aren't my frosty berries beautiful?
Alright let's really get cooken' now! The first thing that you want to do is mix all of your dry ingredients (except the 1 1/2 Tbsp. of sugar that you added to your berries.) Then you want to cut up your butter into about 1/2 inch cubes handling them as little as possible, you want to keep the butter cold this is what makes them flaky. Then with a pastry blender, potato masher or even a food processor you want to cut in the butter until it looks like this, kind of like a course meal.


Next make a well in the center of your mixture. Then beat together your buttermilk and eggs. Pour your milk mixture into your well and starting from the middle mix the ingredients until just combined. Over mixing will cause the gluten to build up in the dough and will ruin the texture of the scones.


Once you have it mixed pull out your berries and gently fold them into the dough. It will be a very stick dough. You then want to turn your dough out onto a generously floured counter and then form your dough into a log about 3 inches wide and 15 inches long. Then cut about ever 2 1/2 inches like so.


Then go back through and cut them into triangles. In this picture you can also see my cool chopper thing. I am sure that it has a more technical name but as far as I am concerned it is my "cool chopper thing." You can get them at just about any kitchen store and I highly recommend them. They make so many things so much easier!


Then place them on parchment paper and bake at 400 degrees for 15-18 minutes or until golden brown on top.


Then place them on a cooling rack and get started on your glaze.


This next story is of a lemon and an orange and a dual! I could not make up my mind as to what kind of a glaze I wanted for these babies. So I will let you dual this one out for yourself the glaze will work for either one.


1 C. Powdered Sugar


2 Tbsp. Fresh Orange/ Lemon Juice


1 Tsp. Orange/Lemon Zest


Whisk together the above ingredients in a bowl and drizzle over the tops of slightly cooled scones and enjoy!


One last tip, Raspberries are amazing in this recipe also!
***Disclaimer, while I use my buttermilk past its due date it is true that using things past the due date can make you sick so use your best judgement on this one!***

Tuesday, June 14, 2011

Citrus Tarragon Chicken Kabobs

This week I made Citrus Tarragon Chicken Kabobs and can I just say that eating off of a stick is fun especially for kids. Not only are they fun but they are down right delicious and perfect for your summer BBQ's!


Citrus Tarragon Chicken Kabobs


Alright enough chit chat we've got to get these babies on the grill because the next place they will go is in your mouth and I promise you will be thanking me for it! Here's what you are going to need.


1/2 C. Orange Marmalade


1/3 C. Fresh Lime Juice


2 Tbsp. Soy Sauce


2 Tbsp. Honey


1/2 Tsp. Ginger Powder


1/8 Tsp. Red Pepper Flakes


1 1/2 Tbsp. Fresh Tarragon


2 Tbsp. Green Onions, Sliced Thinly


4 Chicken Breasts


2 "Bountiful" Onions


6 Sweet "Bountiful" Peppers


1 lb. "Bountiful"Yukon Gold Potatoes (Last Weeks Basket)


12 Skewers


Now the question that I have to ask myself is just how did I forget 3 things in this photo shoot? Well here they are and these Kabobs are so much better with them.


1/4 C. Fresh Lemon Juice


3 Cloves Garlic


1 Tsp. Fresh Thyme


Salt and Pepper


The first thing that you want to do is make the marinade. Whisk together
all of the above ingredients except the your "Bountiful" Veggies and the Chicken. Then cut your chicken into 1 inch chunks. Place the chicken into a zip top bag and pour 3/4 of the marinade into the plastic bag and let it marinate anywhere from 2 hours to 24 hours. While your chicken is marinating chop your "Bountiful" Veggies into 1 inch chunks. You also will want to soak your skewers in water if you are using bamboo or wooden skewers. Now it is time to assemble and get grillin' I like to assemble mine like so... chicken, onion, pepper... I think that one of the best parts of making Kabobs is that you can make them with what ever veggies you want. Or you can make them with just chicken but is this Bountiful Bliss or what? We need and love our veggies! Salt and Pepper your Kabobs generously with Kosher Salt and Freshly Cracked Black Pepper. Now for the grill! Set your grill to Medium Low once your grill is hot turn it off and spray your grill with Pam for Grilling (It's new and I love it! You can get it just about anywhere) so that your Kabobs don't stick and then turn it back on and place your Kabobs on the Grill. As soon as the chicken is cooked through take them off of the grill serve with remaining marinade and enjoy!


Helpful Hints: The basket this week was also great to make the Caramelized Onion Salad that I blogged about last week. Bountiful Onions, Pears and Lettuce your all set for two great dinners this next week!


Oh I almost for got! Or as Dylan my 4 year old would say "I loosed my brains!" The Potatoes. The first thing that you want to do is chop them into 1 inch chunks and boil them until they are cooked through. Then let them cool, I did this step while I was waiting for my chicken to marinade. Once they are cool enough skewer them and brush them with olive oil, or spray them with Pam and season them with Heather's Seasoning Salt (see Stuffed Mirlitons for the recipe) or kosher salt and fresh black pepper. Then place on the grill and cook until they are golden brown. They are fantastic! They taste like homemade potato chips, your going to love them! Do you see them peeking out under the other Kabobs?
Such a fun and delicious dinner!


One last thing until I say goodbye until next week. With it being summer and all of the craziness that comes with it I will be blogging on Wednesdays for now. Thank you for following me through this journey I'll see you next Wednesday!

Tuesday, June 7, 2011

Caramelized Onion Salad With Goats Cheese, Candied Walnuts, Pears and Arugula

Onions, onions... I have to admit that for the majority of my life I have not been a fan. But as soon as I started really getting into cooking I realized that onions make just about everything taste better. Yes Dad I said it! From the time that I was a little girl I can remember my Dad sauteing onions every Saturday night many times making his "Spuds". I think that he particularly enjoyed making his "Spuds" as I became a teenager. There is nothing like going out on Saturday night smelling like onions. Some Dads clean their guns at the table when boys come to pick up their daughters for a date, but not my Dad he would pull out the onions. Aw well now I am the one smelling like onions all on my own accord. So if you are sitting next to me someday wondering, what is that smell? Just know that it is the onions and I couldn't do it without them. This week I am making Caramelized Onion Salad with Goat Cheese, Candied Walnuts, Pears and Baby Arugula. Wow that is a long name! I need a new name for this and I am taking suggestions... Anyone?


Caramelized Onion Salad With Goats Cheese, Candied Walnuts, Pears and Arugula


I do have to warn you before you get started that this dish has a few steps but don't let that stop you from making this delicious salad, you can do just about all of them ahead of time. This salad would compliment any meal as a side salad or be excellent as a main dish. Let's get cooken'! The first thing that you want to do to get this salad put together is to make the Candied Walnuts. They take a while to dry and set up so you want to make these ahead of time. You can also buy them already made if you are short on time.


2 C. Toasted Walnuts


1/3 C. Brown Sugar


2 Tbsp. Butter


1/8 Tsp. Salt


1/4 C. Water


In a saute pan start by toasting your walnuts over medium heat stirring them frequently and don't walk away! Nuts can burn very fast. As soon as you begin to smell them they are done. Take them out of the pan and set them aside. Then add the remaining ingredients to your pan and bring to a boil, and boil for 1 minute. Then add the walnuts back to your pan and cook them for 4 minutes longer stirring often. Pour them out onto a parchment lined baking sheet separate them so that they don't stick together and allow to cool and set up for at least 2 hours.


Next we move on to the croutons, yes that's right homemade croutons. Of course you could just buy them if you are short on time. But there is just no comparison between homemade croutons and store bought stale croutons and they are very easy to make. Here is what you will need.


1 Loaf "Bountiful" Sourdough Bread (Appox. 4 C.)


1/4 C. Olive Oil


1/2 Tsp. Kosher Salt


1/4 Tsp Black Pepper


1/8 Tsp Garlic Powder


1 Tsp. Fresh Thyme


Set your oven to 375 degrees. Dice your bread into 1/2 inch squares. Then pour them into a bowl. Pour the olive oil over the top of them and add the rest of the ingredients. Toss them together until the squares are completely covered. Then pour them out onto a baking sheet and bake them for 15-20 minutes stirring them often until they are golden brown and crispy.


They also are great just to eat like a snack. Kind of like homemade crackers. My kids just loved them, I had to stop them from eating all of them before I got the salad put together. Now for the rest of the salad. Here is what you will need.


3 "Bountiful" Onions Sliced Thinly


1 Head "Bountiful" Romain, Washed Chopped


Baby Arugula


2-3 Pears, Sliced Thinly


2 Tbsp. Olive Oil


2 Tbsp Balsamic Vinegar (I like the condensed kind)


1/2 Tsp. Salt


1/4 Tsp. Pepper


And don't forget these last two ingredients! It just wouldn't be a Butters in The Kitchen photo shoot if I didn't forget to add something into the picture:)


I love this dressing! It is Briannas Blush Dressing. It is a vinaigrette and absolutely perfect for this salad. It is also good though with a balsamic vinegar dressing, if you prefer it. This next picture is of the Goats Cheese that I used. I just got this at Costco and it is very good. If you are not failure with Goats Cheese it is a very creamy cheese that has a bit of tang to it. It compliments this salad very well. You want to crumble about 1/4lb. of it with a fork to top this salad.
Helpful Hint: If you are not a fan of Goats Cheese or it makes you a bit uneasy, feta would work just fine here as well. Also as you might notice from my picture above I used Bosc Pears for this salad, they were what I could find that were ripe when I needed them, but feel free to use what ever pears you like.


Now you maybe asking what does this picture have to do with this salad and well I'll tell you. This is a picture of my Dad, the onion lover himself. He was my honorary Sous Chef the day that I made this salad. He caramelized the onions for me. I tried to get a picture of him doing it for me with his apron on but he got an important phone call just as I was about to take it so this will have to do.


Now it is time to bring on the onions! Once you have them thinly sliced. Pour your olive oil into a saute pan and turn your stove on to medium high heat. Once the oil begins to shimmer a bit your pan is hot and ready to start sauteing. Add your onions, salt, pepper, and balsamic vinegar into your pan. Then saute them until they are dark golden brown and caramelized. This takes about 18-20 minutes or until they look like this.


Does this look like a big bowl of worms to anyone else? Just thought I would ask:) You can imagine why I might have and aversion to this slimy veggie as a little girl. But if there worms at least they are good tasting worms. I am sure that if you have little boys they would get a kick out of eating worm salad for dinner! But if you think they might be grossed out by it like I would have been best not to mention it. Once you have your big bowl of worms you will need to set them aside and let them cool a bit so that they don't wilt your greens. Now it is time to assemble your salad and enjoy! I had to throw in this one last picture of the salad before the croutons because I think that it turned out absolutely beautiful and the croutons kind of hid it a bit. I hope you love it!